Hello there! How’s your day going? In my last blog post, I walked you through creating a simple password generator serverless function on AWS Lambda using the Lambda console. While it’s a handy tool for getting started with serverless development, it can become cumbersome to manage multiple functions and their associated resources over time. Serverless TypeScript is a powerful combination that allows developers to build scalable and efficient serverless applications using AWS Lambda and the Serverless Framework.
So, in this post, we’ll take the same password generator function we built in the last post and show you how to build it using Typescript and the Serverless Framework . By the end of this post, you’ll have a better understanding of why using the Serverless Framework can be a game-changer for your serverless development workflow. Sounds exciting, doesn’t it? Let’s get started! But before that let’s define What we’ll cover in this post.
What we’ll cover
- What is the serverless Framework ?
- Why choose TypeScript for Serverless Development ?
- Configure you AWS credentials
- Setup the AWS CLI
- Project setup
- Project structure
- Create your password generator lambda function
- Create an API Gateway Endpoint for your lambda function
- Create your mock data for testing your Lambda function
- Import your lambda function in the Serverless Framework configuration file
- Time to test your application
- Deploy your Lambda function to AWS
- Conclusion
What is the serverless Framework?
It’s an open-source tool that simplifies the process of building, deploying, and managing serverless applications. By defining your serverless infrastructure as code, you can easily version control, manage, and collaborate on your serverless projects.
Using the Serverless Framework can significantly speed up development time and reduce the risk of errors since you can automate the deployment process and test your code in a staging environment before deploying it to production. And who doesn’t love a smoother workflow, right?
Now that we’ve talked about the Serverless Framework and how it can simplify serverless development, let’s dive into why TypeScript is a great choice for serverless development.
Why choose TypeScript for Serverless Development?
If you’re developing a serverless application, you want to choose a programming language that can help you write clean, efficient code that scales well. And that’s where TypeScript comes in!
TypeScript is a superset of JavaScript that offers additional features like static typing, interfaces, and classes. What does that mean for you? It means you can catch errors earlier in the development process, organize and structure your code more easily, and keep your codebase maintainable even as it grows.
Overall, choosing TypeScript for your serverless development can help you write better code, avoid common errors, and make your serverless workflow more efficient. So why not give it a try and see the benefits for yourself?
In the next section, we’ll show you how to build a serverless REST API with Node.js and TypeScript using the Serverless Framework. Let’s first start by configuring your aws credential.
Configure your AWS credentials
To run and manage our serverless functions, we need to :
Set up the AWS CLI
To set up the AWS CLI, follow these steps:
- Install the AWS CLI: You can download and install the AWS CLI for your operating system by following the steps in the official docs.
- Open a terminal window and run the
aws configurecommand. - Enter your AWS access key ID and secret access key when prompted.
- Enter the default region name and output format when prompted.
- Test your configuration by running a command like
aws s3 ls. - If the command runs successfully, your AWS CLI setup is complete.
Project setup
Here’s a step-by-step guide on how to set up a project with the Serverless Framework using TypeScript:
- First, you need to have Node.js installed on your computer. You can download and install it from the official website
- Open a terminal or command prompt and run the following command to install the Serverless Framework globally:
npm install -g serverless
- Once the installation is complete, create a new directory for your serverless project and navigate into it and run :
serverless create --template aws-nodejs-typescript --path password-generator
- Navigate into password-generator directory and run
npm installto install the dependencies.
Project structure
The project code base is mainly located within the src folder. It contains two subfolders functions and libs.
functions: This subfolder contains the source code for the Lambda functions used in the project. Each function has its own subfolder containing ahandler.tsfile, anindex.tsfile that exports the function, and other files that support the function’s implementation, such asmock.jsonandschema.ts.libs: This subfolder contains shared library code that is used across the project. It contains various utility files such asapiGateway.ts,handlerResolver.ts, andlambda.ts.
password-generator
├── src
│   ├── functions
│   │   ├── hello
│   │   │   ├── handler.ts
│   │   │   ├── index.ts
│   │   │   ├── mock.json
│   │   │   └── schema.ts
│   │   │
│   │   └── index.ts
│   │
│   └── libs
│       └── apiGateway.ts
│       └── handlerResolver.ts
│       └── lambda.ts
│
├── package.json
├── serverless.ts               # Serverless service file
├── tsconfig.json               # Typescript compiler configuration
├── tsconfig.paths.json         # Typescript paths
└── webpack.config.js           # Webpack configuration
The serveless.ts file is the main configuration file for the Serverless Framework, which is a powerful tool that helps you deploy and manage your serverless application. This file contains important settings that are used to deploy your application to AWS, including details about each Lambda function and other resources that your application needs.
Overall, the src folder and serverless.ts file are both critical components of a serverless project built with TypeScript and the Serverless Framework. The src folder contains the actual source code for the project, while the serverless.ts file contains the configuration information necessary to deploy the project to AWS.
In the next section, we’ll dive into creating the actual password generator Lambda function that will power your application. This is where the magic happens!
Create your password generator lambda function
To start, we’re going to remove the hello folder inside of the functions folder. In the functions folder, create a new folder called generate-password.
Let’s create our lambda function by creating a new file called handler.ts where you will put this code :
import type { ValidatedEventAPIGatewayProxyEvent } from '@libs/api-gateway';
import { formatJSONResponse } from '@libs/api-gateway';
import { middyfy } from '@libs/lambda';

import schema from './schema';

const generatePassord: ValidatedEventAPIGatewayProxyEvent<typeof schema> = async (event) => {
  try {
    let length = 12;
    if (event.body.length) {
      length = parseInt(event.body.length)
    }
    const chars = "ABCDEFGHIJKLMNOPQRSTUVWXYZabcdefghijklmnopqrstuvwxyz0123456789";
    let password = "";
    for (let i = 0; i < length; i++) {
      password += chars.charAt(Math.floor(Math.random() * chars.length));
    }
    return formatJSONResponse({ password });
  } catch (error:any) {
    return formatJSONResponse({ error: error.message }, 500)
  }

};

export const main = middyfy(generatePassord);
Alrighty, so this code is for a TypeScript Lambda function that generates a random password. Cool, right? Let’s dive in!
The first three lines import some modules that we’ll need for the function. Think of them like your trusty sidekicks – they’re always there to lend a helping hand when you need them. ValidatedEventAPIGatewayProxyEvent makes sure that the event being passed into the Lambda function is a valid API Gateway event, while formatJSONResponse is the function that formats the response from the Lambda function as JSON. And middyfy is like the fairy godmother who wraps the Lambda function in middleware to make it easier to work with. Abracadabra!
The fourth line imports a JSON schema that describes the expected structure of the API Gateway event. This is like a blueprint that tells the code what the event should look like. It’s like making sure the ingredients you’re using for a recipe are all there before you start cooking!
The fifth line defines the Lambda function itself, and it’s called generatePassword. It takes in an event of type ValidatedEventAPIGatewayProxyEvent<typeof schema>. This is like setting the stage for the magic trick – you’re making sure that everything is in place before you start pulling rabbits out of hats.
Inside the generatePassword function, we parse the event to get the desired length of the password. We then generate a random password using that length and a set of allowed characters. It’s like a game of Mad Libs, but for passwords!
If everything goes well, we call the formatJSONResponse function to return the password in a JSON-formatted response. And if there’s an error, we call formatJSONResponse with an error message and a 500 status code. It’s like playing a game of “Yes, And…” – if everything goes according to plan, we respond with the password, and if something goes wrong, we acknowledge the problem and try to fix it.
Finally, we wrap the generatePassword function in middleware using middyfy and export it as main. It’s like putting the finishing touches on a masterpiece and hanging it up in a gallery. Ta-da!
Let’s go over the formatJSONResponse function implementation. Go to the libs folder and replace the api-gateway.ts content with the following code bellow:
import type { APIGatewayProxyEvent, APIGatewayProxyResult, Handler } from "aws-lambda"
import type { FromSchema } from "json-schema-to-ts";

type ValidatedAPIGatewayProxyEvent<S> = Omit<APIGatewayProxyEvent, 'body'> & { body: FromSchema<S> }
export type ValidatedEventAPIGatewayProxyEvent<S> = Handler<ValidatedAPIGatewayProxyEvent<S>, APIGatewayProxyResult>

export const formatJSONResponse = (response: Record<string, unknown>, statusCode: number = 200) => {
  return {
    statusCode,
    headers: {
      "Content-Type": "application/json",
      "Access-Control-Allow-Origin": "*"
    },
    body: JSON.stringify(response)
  }
}
The first few lines import some types that are used in AWS Lambda functions. The next line imports a utility type that converts a JSON schema to a TypeScript type.
The next few lines define a new type that extends the APIGatewayProxyEvent type and adds a body property with a type that is generated from the JSON schema. This type is used to validate the incoming request to the Lambda function.
The next line exports a new type that is a handler for the validated API Gateway proxy event. This type is used to handle the incoming request to the Lambda function.
Finally, there is a function that formats the response as JSON. This function takes an object and an optional status code as arguments and returns an object with the following properties: statusCode, headers, and body.
Now that you created your lambda function, in the next section we’ll walk through the process of creating an api gateway for your lambda function using the Serverless Framework.
Create an API Gateway Endpoint for your lambda function
Creating an API Gateway endpoint is an important step in building a serverless application. This is because API Gateway acts as a front-door to your application, allowing you to control access to your backend services and provide a consistent interface for your clients.
In order for your function to work properly and be deployed to AWS, you need to define its behavior and specify the events that trigger it.
To do so, create a new file in the same directory called index.ts and put the code bellow.
import schema from './schema';
import { handlerPath } from '@libs/handler-resolver';

export default {
  handler: `${handlerPath(__dirname)}/handler.main`,
  events: [
    {
      http: {
        method: 'post',
        path: 'generate-password',
        request: {
          schemas: {
            'application/json': schema
          }
        }
      }
    }
  ]
};
So, this code is setting up an API Gateway endpoint that generates a random password when a POST request is made to the /generate-password path. Let’s break it down!
The first line imports the JSON schema we’ll be using to validate the request. Think of this schema like a bouncer at a club – it makes sure that anyone who tries to come in meets certain requirements before they’re allowed in.
The second line imports a cool function called handlerPath from a module called @libs/handler-resolver. This function helps us resolve the path to our Lambda function handler, which is super useful because it saves us a lot of time and headache!
The next line sets up our endpoint. We start by defining our handler function and setting it to ${handlerPath(__dirname)}/handler.main. This is like the bouncer giving you a stamp on your hand that says you’re allowed to enter the club.
Then, we define the events that trigger our endpoint. In this case, we’re only setting up one event that will be triggered by an HTTP POST request to /generate-password. It’s like saying “Hey, if anyone wants to generate a password, they can make a POST request to this URL!”
Inside the http object, we define the method (POST), the path (/generate-password), and the request schema ('application/json': schema). This is like giving the bouncer at the club specific instructions on how to handle different situations.
And that’s it! We’ve set up our API Gateway endpoint to generate a random password when a POST request is made to the /generate-password path.
We talk about the schema file previously as a file that defines the structure of the JSON object that will be passed to the Lambda function. Let’s create it! Inside of the same directory, create a new file called schema.ts . And put the code bellow:
export default {
  type: "object",
  properties: {
    length: { type: 'string' }
  }
} as const;
The schema specifies that the JSON object is an object with a single property called length, which is a string.
Now that you understand the importance of creating your Lambda function api endpoint with the Serverless Framework export your generatePassword function to make it available for other parts of your application.
To do so, update the index.ts file inside of the functions folder by replacing the code inside of it with the following code
export { default as generatePassword } from './generate-password';
At this point, your project structure should be as follow :
password-generator
├── src
│   ├── functions               # Lambda configuration and source code folder
│   │   ├── generate-password
│   │   │   ├── handler.ts      # `generatePassword` lambda source code
│   │   │   ├── index.ts        # `generatePassword` lambda Serverless configuration
│   │   │   ├── mock.json       # `generatePassword` lambda input parameter, if any, for local invocation
│   │   │   └── schema.ts       # `generatePassword` lambda input event JSON-Schema
│   │   │
│   │   └── index.ts            # Import/export of all lambda configurations
│   │
│   └── libs                    # Lambda shared code
│       └── apiGateway.ts       # API Gateway specific helpers
│       └── handlerResolver.ts  # Sharable library for resolving lambda handlers
│       └── lambda.ts           # Lambda middleware
│
├── package.json
├── serverless.ts               # Serverless service file
├── tsconfig.json               # Typescript compiler configuration
├── tsconfig.paths.json         # Typescript paths
└── webpack.config.js           # Webpack configuration
Create your mock data for testing your Lambda function
When you’re developing a Lambda function, you may not always have access to real data that your function will be processing. That’s where mock data comes in handy. The mock.json file provides a way to simulate input data for your Lambda function so you can test its behavior and ensure that it’s working as expected.
Let’s create a mock.json file in the same directory. Put the code bellow:
{
  "headers": {
    "Content-Type": "application/json"
  },
  "body": "{\"length\": \"12\"}"
}
Import your lambda function in the Serverless Framework configuration file
Now that we’ve created the generatePassword Lambda function, we need to import it into the Serverless Framework configuration file, serverless.ts. This will allow us to include the function in our application and deploy it to AWS. Replace the code in the serverless.ts file with the following code bellow:
import type { AWS } from '@serverless/typescript';

import generatePassword from '@functions/generate-password';

const serverlessConfiguration: AWS = {
  service: 'password-generator',
  frameworkVersion: '3',
  plugins: ['serverless-esbuild'],
  provider: {
    name: 'aws',
    runtime: 'nodejs14.x',
    apiGateway: {
      minimumCompressionSize: 1024,
      shouldStartNameWithService: true,
    },
    environment: {
      AWS_NODEJS_CONNECTION_REUSE_ENABLED: '1',
      NODE_OPTIONS: '--enable-source-maps --stack-trace-limit=1000',
    },
  },
  // import the function via paths
  functions: { generatePassword },
  package: { individually: true },
  custom: {
    esbuild: {
      bundle: true,
      minify: false,
      sourcemap: true,
      exclude: ['aws-sdk'],
      target: 'node14',
      define: { 'require.resolve': undefined },
      platform: 'node',
      concurrency: 10,
    },
  },
};

module.exports = serverlessConfiguration;
The configuration file includes information about the name of your serverless application, the AWS provider and resources, the functions that are part of your application, and the packages and plugins required for your application to run smoothly.
The generatePassword function that we created earlier is also included in this file, and it is specified as part of the functions property. Additionally, the custom property includes a configuration object for the serverless-esbuild plugin, which is used to optimize your Lambda function’s code and improve performance.
Time to test your application
Now, that everything is set for deployment. It usually a best practice to test locally before deployment to AWS. Thanks to our comand line, we can simulate a test locally using the mock data we previously created. Go to the root folder of your project, open the comand line terminal and run the code bellow
sls invoke local -f generatePassword --path src/functions/generate-password/mock.json
You should see an output like the one in the screeshot bellow:
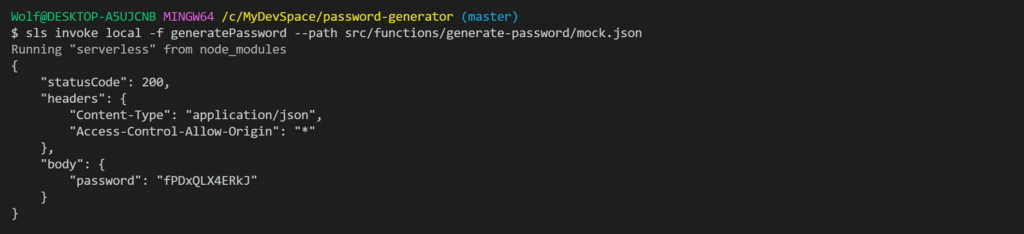
Congratulations! Your function was successfully executed!
Now that everything is set, let’s deploy our application to AWS.
Deploy your Lambda function to AWS
Now it’s time to deploy your lambda function to AWS using the command bellow:
serverless deploy
Once the deployment is completed, you should see your endpoints and function in the terminal as shown in the screenshot bellow:
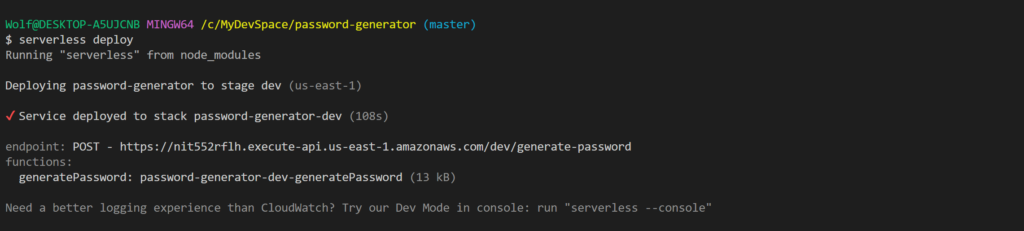
Congratulations! Your lambda function is up and running on AWS.
Let’s test it by using Postman.
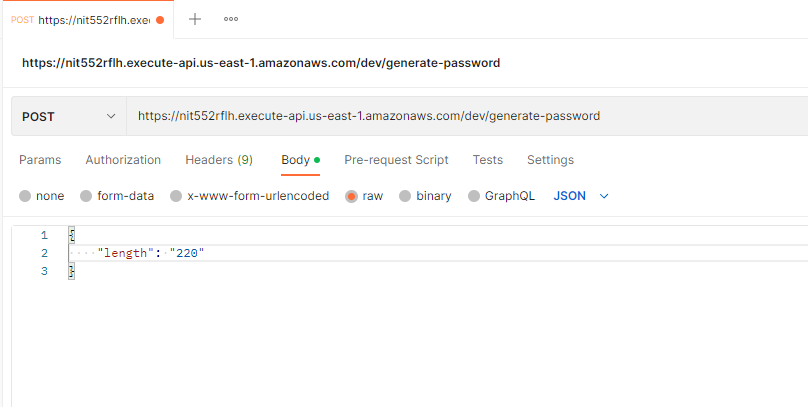
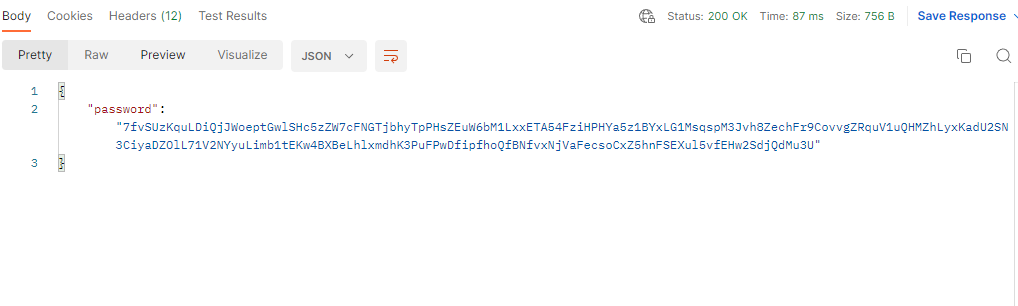

After testing, the endpoint, make sure to remove your stack on AWS so you can avoid to pay fees for all the resources you created. You can remove your service by running this command on your project directory
serverless remove
Conclusion
Congratulations! You’ve just learned how to build a password generator application using the Serverless Framework with Typescript. With this knowledge, you can build powerful and scalable serverless applications for a variety of use cases.
Throughout this tutorial, we’ve covered the basics of AWS Lambda, the Serverless Framework, and the different components of a serverless application. We’ve also explored how to create a password generator Lambda function and configure it with the Serverless Framework.
If you want to see the full source code for this application, you can find it on this GitHub repository or the original blog post. By exploring the code, you can get a better understanding of how everything fits together and build upon it to create your own serverless applications.
By leveraging the power of serverless computing, you can build applications that are highly available, scalable, and cost-effective. Whether you’re building a simple web application or a complex data processing pipeline, serverless computing can help you achieve your goals more quickly and easily.
We hope you found this tutorial helpful and that you’re inspired to build your own amazing serverless applications. Remember to experiment, learn, and have fun!